EVO Hosting
  • Hosting
    • Business Hosting
    • PICO Hosting
    • PLESK Hosting
    • Extra Hosting
  • VPS SSD Linux
    • VPS SSD 1
    • VPS SSD 2
    • VPS SSD 3
    • VPS SSD 4
    • VPS SSD 5
  • Domain
    • ตรวจสอบโดเมนเนม
    • โดเมนเนม สกุล .th
    • เอกสารสำหรับจดโดเมนเนม .th
    • เอกสารสำหรับย้ายโดเมนเนม .th
  • Co-Location
  • การแจ้งชำระเงิน
    • วิธีการชำระค่าบริการ
    • ชำระเงินผ่านระบบ LINE Pay
    • แจ้งชำระค่าบริการ
  • Contact US
  • Client
Select Menu
  • Hosting
    • Business Hosting
    • PICO Hosting
    • PLESK Hosting
    • Extra Hosting
  • VPS SSD Linux
    • VPS SSD 1
    • VPS SSD 2
    • VPS SSD 3
    • VPS SSD 4
    • VPS SSD 5
  • Domain
    • ตรวจสอบโดเมนเนม
    • โดเมนเนม สกุล .th
    • เอกสารสำหรับจดโดเมนเนม .th
    • เอกสารสำหรับย้ายโดเมนเนม .th
  • Co-Location
  • การแจ้งชำระเงิน
    • วิธีการชำระค่าบริการ
    • ชำระเงินผ่านระบบ LINE Pay
    • แจ้งชำระค่าบริการ
  • Contact US
  • Client

การติดตั้ง OpenCart

Make Difference Make It Easy
You are here:  Home › CMS › การติดตั้ง OpenCart

การติดตั้ง OpenCart

Jun 28th, 2013 In : CMS, Direct Admin, เรื่องอื่น ๆ By : EVOHosting 0 Comments

 logoว่าด้วยเรื่องระบบตระกร้าสินค้า มี CMS ฟรี หลายตัวให้เราเลือกใช้ แต่ อีโว โฮสติ้ง ขอแนะนำ OpenCart เนื่องจากการติดตั้งง่าย สะดวกต่อการใช้งาน ทั้งฝั่งหน้าร้าน และหลังร้าน มีระบบวิเคราะห์ต่าง ๆ ครบครัน และนอกจากนี้ ระบบของ OpenCart ยังถือว่าสมบูรณ์แบบ รวมถึงมี Module ต่าง ๆ ที่เอื้ออำนวยให้เจ้าของเว็บได้ใช้งานอย่างมาก และมีการอัพเดทที่ต่อเนื่อง จึงเป็นตัวหนึ่งที่เราภูมิใจเสนอ

ขั้นตอนการติดตั้ง OpenCart

สำหรับขั้นตอนการติดตั้ง OpenCart ก่อนอื่นต้องทำการ Download File จากเว็บไซต์ของ OpenCart ก่อนเลยครับ

Download Link

http://www.opencart.com/index.php?route=download/download

เมื่อเข้าไปที่หน้าเว็บ OpenCart แล้ว สามารถเลือก Download Version ล่าสุดได้เลย เมื่อทำการ Download OpenCart มาแล้วให้ทำการ UnZip หรือ แตกไฟล์ออก แล้วทำการอัพโหลดขึ้นสู่โฮสติ้ง (ดูขั้นตอนการอัพโหลดไฟล์ได้ที่นี่)

สำหรับ OpenCart นั้น ให้เรา เปลี่ยนชื่อไฟล์ ทั้งหมด 2 ที่ก่อนทำการอัพโหลดนะครับ หรือถ้าอัพโหลดไปแล้ว ก็เข้าไปแก้ไขไฟล์ config-dist.php เป็น config.php ทั้งสองที่นะครับ

config-dist.php
admin/config-dist.php

เป็น

config.php
admin/config.php

ขั้นตอนเตรียมความพร้อมก่อนการติดตั้ง ให้เราไปสร้าง MySQL ขึ้นมา ก่อน (ดูขั้นตอนการสร้าง MySQL ได้ที่นี่)

ในขั้นตอนการติดตั้งปรกตินั้นจะต้องทำการแก้ไข Permission ของ File และ Folder ตามที่ WordPress ต้องการก่อน แต่สำหรับโฮสติ้งของ EVO Hosting ไม่จำเป็นต้องทำการแก้ไข Permission สามารถข้ามขั้นตอนนี้ไปได้เลย

ขั้นตอนการติดตั้งสำหรับโฮสติ้งของ อีโว โฮสติ้ง

  1. หลังจากนั้นทำการแตกไฟล์ออกมา
  2. เข้าสู่หน้าเว็บไซต์ที่ทำการติดตั้ง
  3. กรอกข้อมูลการเชื่อมต่อ MySQL
  4. กรอกข้อมูลของเว็บไซต์ และข้อมูล Username และ Password ของ Administrator

เรามาเริ่มลงมือติดตั้ง OpenCart กันเลยดีกว่า หลังจากทำการอัพโหลด OpenCart เสร็จเรียบร้อยแล้ว ให้เข้าไปยัง หน้าเว็บไซต์ของเรา สำหรับการติดตั้ง OpenCart จะมีเพียง 4 ขั้นตอน

opencart1
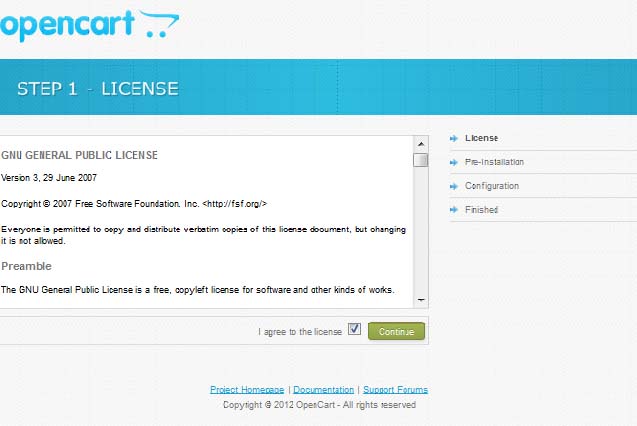
รูปที่ 1. หน้าแสดง License 

ในหน้านี้จะแสดง License ของ Script ให้เรา Click Check Box “I agree to the license” แล้ว Click “Continue” เพื่อดำเนินการ ในขั้นตอนต่อไป

opencart2
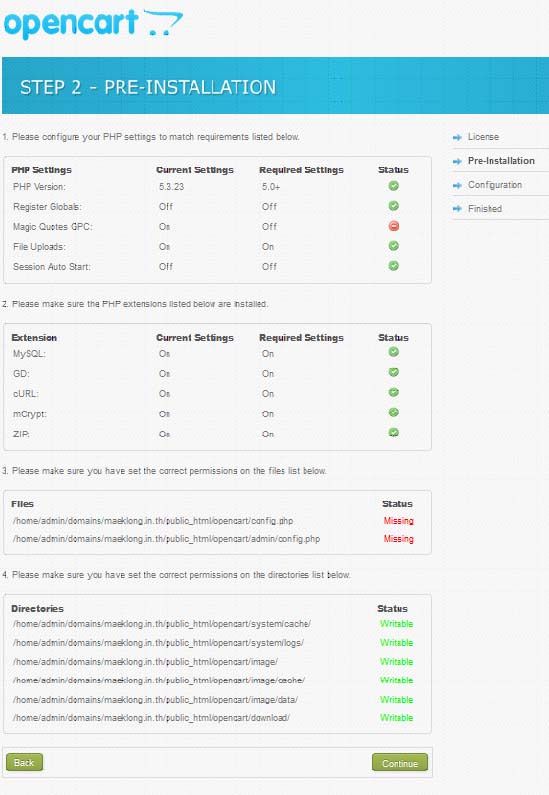
รูปที่ 2. หน้า Pre-Installation

 สำหรับขั้นตอนที่ 2 นี้ ระบบ OpenCart จะเป็นหน้าเพจสำหรับเตรียมตัวก่อนการติดตั้ง และแสดง Error ต่าง ๆ ขึ้นมา ถ้า เราได้เปลี่ยนชื่อไฟล์ config-dist.php เป็น config.php ทั้งสองที่แล้วจะไม่แสดง Error ดังรูปภาพที่ 2. (ในข้อ 3. File) เราสามารถดำเนินการต่อไปได้เลย หากยังไม่ได้เปลี่ยนชื่อไฟล์ให้ทำการเปลี่ยนชื่อไฟล์ก่อนนะครับ เมื่อพร้อมแล้วให้เรา Click “Continue” เพื่อเข้าสู่ขั้นตอนต่อไปได้เลย

opencart3
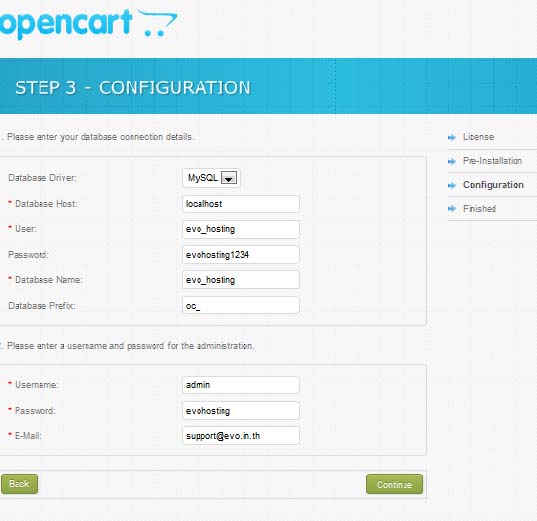
รูปที่ 3. Configuration การกำหนดค่า MySQL และ Administrator Account

เมื่อเราเข้าสู่ขั้นตอนที่ 3 ให้เรานำข้อมูลที่เราเตรียมไว้ในเบื้องต้นเกี่ยวกับ MySQL มากรอกในช่องต่าง ๆ ให้ครบถ้วน โดยเราจะกรอกเพียง 3 ช่องได้แก่

  • User คือ User ของ Database ที่เราได้สร้างขึ้นมา
  • Password คือ Password ของ Database ที่เราได้สร้างขึ้นมา
  • Database Name คือ ชื่อของฐานข้อมูล หรือ Database ที่เราได้สร้างขึ้นมา

เมื่อกรอกข้อมูลส่วน MySQL เสร็จแล้วก็มาถึงในส่วนของข้อมูล Administrator หรือ ผู้ดูแลเว็บไซต์ ให้เรากรอกข้อมูล 3 ช่องดังนี้

  • Username
  • Password
  • E-Mail

เมื่อกรอกข้อมูลในส่วนของ Administratror เสร็จแล้วให้เรา Click “Continue” ระบบจะทำการติดตั้งฐานข้อมูลและ ก็จะเข้าสู่ขั้นตอนที่ 4 ซึ่งเป็นขั้นตอนสุดท้ายครับ

opencart4
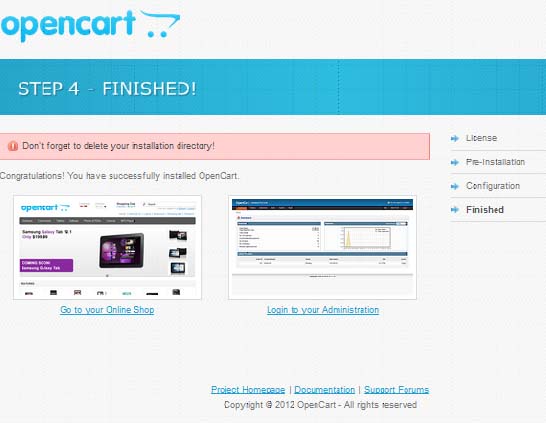
รูปที่ 4. เสร็จสิ้นการติดตั้ง

เมื่อมาถึงขั้นตอนนี้ แสดงว่าเราได้ทำการติดตั้งเสร็จสมบูรณ์แล้ว และเราสามารถชมหน้าเว็บเราโดยการ Click ที่ฝั่งซ้าย หรือจะเข้าไปจัดการระบบหลังบ้าน ก็ Click ที่ฝั่งขวา

แต่ถึงขั้นตอนการติดตั้งแล้ว แต่ยังไม่เสร็จเสียทีเดียวนะครับ เพราะ ด้านบน เราจะเห็น มีแถบสีแดง ๆ เตือนเราอยู่

Don’t forget to delete your installation directory!

ให้เรา เข้า FTP อีกครั้งเพื่อทำการลบ Folder install ออกเสียก่อนนะครับ เพื่อไม่ให้ผู้ไม่ประสงค์ดีเข้ามาดำเนินการใด ๆ กับเว็บเราได้

ปฏิทิน

May 2025
S M T W T F S
 123
45678910
11121314151617
18192021222324
25262728293031
« Nov    

คลังความรู้

  • วิธี Upgrade VestaCP php 7.2 November 18, 2019
  • Symbolic Link November 16, 2019
  • วิธีการติดตั้ง CMS June 11, 2019
  • วิธีติดตั้ง fail2ban กับ DirectAdmin April 2, 2019
  • วิธีแก้ไขปัญหา Let’s Encrypt HTTP/1.1 400 Bad Request September 13, 2018
  • การตั้งค่า SSL ให้ Domain Name June 25, 2018
  • วิธีการ rewrite url http to https June 25, 2018
  • วงจรอายุโดเมน Domain Life Cycle June 4, 2018
  • แก้ไข letsencrypt does not match current agreement December 10, 2017
  • เพิ่มประสิทธิภาพให้ ClamAV Anti Malwere สำหรับ PHP December 10, 2017
  • วิธีการใช้งานโปรแกรม WinSCP November 8, 2016
  • วิธีเปลี่ยน Port Remote Desktop July 4, 2016
  • Upgrade clamav June 5, 2016
  • How to yum groupinstall June 5, 2016
  • วิธีแก้ไข หากขอ SSL Let’s encrypt แล้ว Error May 28, 2016
  • วิธีการติดตั้ง Let’s Encrypt automated free SSL certificate April 24, 2016
  • เมนูต่าง ๆ ของ User ใน DirectAdmin (DA) February 24, 2016
  • การขอใบรับรอง (SSL) ของ Let’s Encrypt February 22, 2016
  • การสร้างอีเมลแอคเค้าท์ January 20, 2016
  • การเพิ่มฐานข้อมูล ใน DirectAdmin January 13, 2016
  • การเปลี่ยนชื่อโดเมนเนม ในระบบ DirectAdmin January 13, 2016
  • เพิ่มโดเมนใหม่ ในระบบ DirectAdmin January 13, 2016
  • วิธีติดตั้ง mod_ruid2 November 20, 2014
  • การยืนยันตัวตน ของ ระบบ Domain Name July 23, 2014
  • วิธีติดตั้ง CSF Firewall on CentOS 6 + DirectAdmin July 11, 2014
  • วิธีติดตั้ง XCache บน Server November 19, 2013
  • 5 ขั้นตอน ติดตั้ง DirectAdmin October 9, 2013
  • ความแตกต่างระหว่าง Economic Hosting Plan กับ Business Hosting Plan July 3, 2013
  • 5 เหตุผลที่ไม่ควรใช้ Facebook แทน Website July 3, 2013
  • การติดตั้ง OpenCart June 28, 2013
  • การติดตั้ง Forum SMF June 27, 2013
  • การติดตั้ง WordPress June 25, 2013
  • ยกเลิกการแสดง error ใน php June 25, 2013
  • ขั้นตอนการอัพโหลดไฟล์ผ่านโปรแกรม ftp ขึ้นโฮสติ้ง June 23, 2013
  • RAID คืออะไร June 21, 2013
  • มัลแวร์ กับ โฮสติ้ง (Malware กับ Hosting) June 21, 2013
  • เกี่ยวกับ อีโว โฮสติ้ง June 6, 2013
  • ความหมายของ Web Hosting June 1, 2013
  • รายการฟังก์ชั่นที่มีการยกเลิก ใน PHP 5.3 April 9, 2013
  • การแก้ไข Error Deprecated: Function mysql_db_query() is deprecated April 8, 2013

คลังความรู้

Business Hosting

Prestige Hosting
Silver Hosting
Gold Hosting
Platinum Hosting
Diamond Hosting

PICO Hosting

PICO Hosting 1
PICO Hosting 2
PICO Hosting 3
PICO Hosting 4
PICO Hosting 5

PLESK HOSTING

Exclusive Hosting 10
Exclusive Hosting 20
Exclusive Hosting 30
Exclusive Hosting 40
Exclusive Hosting 50

Extra Hosting

Extra Hosting 10
Extra Hosting 20
Extra Hosting 30
Extra Hosting 40
Extra Hosting 50

VPS SSD Hosting

SSD VPS 1
SSD VPS 2
SSD VPS 3
SSD VPS 4
SSD VPS 5

Copyright © 2009 - 2018 EVOHosting.in.th Web Hosting All right reserved.
| ทะเบียนพาณิชย์ | IDC | Server Spec | Terms Of Service | Privacy Policy |
| EVO.in.th | evoHosting.in.th | evoVPS.in.th |

We use cookies on our website to give you the most relevant experience by remembering your preferences and repeat visits. By clicking “Accept All”, you consent to the use of ALL the cookies. However, you may visit "Cookie Settings" to provide a controlled consent.
Cookie SettingsAccept All
Manage consent

Privacy Overview

This website uses cookies to improve your experience while you navigate through the website. Out of these, the cookies that are categorized as necessary are stored on your browser as they are essential for the working of basic functionalities of the website. We also use third-party cookies that help us analyze and understand how you use this website. These cookies will be stored in your browser only with your consent. You also have the option to opt-out of these cookies. But opting out of some of these cookies may affect your browsing experience.
Necessary
Always Enabled
Necessary cookies are absolutely essential for the website to function properly. These cookies ensure basic functionalities and security features of the website, anonymously.
CookieDurationDescription
cookielawinfo-checkbox-analytics11 monthsThis cookie is set by GDPR Cookie Consent plugin. The cookie is used to store the user consent for the cookies in the category "Analytics".
cookielawinfo-checkbox-functional11 monthsThe cookie is set by GDPR cookie consent to record the user consent for the cookies in the category "Functional".
cookielawinfo-checkbox-necessary11 monthsThis cookie is set by GDPR Cookie Consent plugin. The cookies is used to store the user consent for the cookies in the category "Necessary".
cookielawinfo-checkbox-others11 monthsThis cookie is set by GDPR Cookie Consent plugin. The cookie is used to store the user consent for the cookies in the category "Other.
cookielawinfo-checkbox-performance11 monthsThis cookie is set by GDPR Cookie Consent plugin. The cookie is used to store the user consent for the cookies in the category "Performance".
viewed_cookie_policy11 monthsThe cookie is set by the GDPR Cookie Consent plugin and is used to store whether or not user has consented to the use of cookies. It does not store any personal data.
Functional
Functional cookies help to perform certain functionalities like sharing the content of the website on social media platforms, collect feedbacks, and other third-party features.
Performance
Performance cookies are used to understand and analyze the key performance indexes of the website which helps in delivering a better user experience for the visitors.
Analytics
Analytical cookies are used to understand how visitors interact with the website. These cookies help provide information on metrics the number of visitors, bounce rate, traffic source, etc.
Advertisement
Advertisement cookies are used to provide visitors with relevant ads and marketing campaigns. These cookies track visitors across websites and collect information to provide customized ads.
Others
Other uncategorized cookies are those that are being analyzed and have not been classified into a category as yet.
SAVE & ACCEPT